Just a short post, of a small project that I just thought was fun to film.
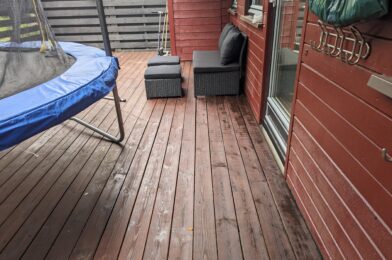
I’ve sanded the entire veranda down and put some fresh stain on it. Before doing the last bit I decided to film and share it.
Cheers!
Just a short post, of a small project that I just thought was fun to film.
I’ve sanded the entire veranda down and put some fresh stain on it. Before doing the last bit I decided to film and share it.
Cheers!
Sometimes when I’m browsing the web I get inspired by whatever it is I’m looking at. That so happened when I stumbled upon the following picture:

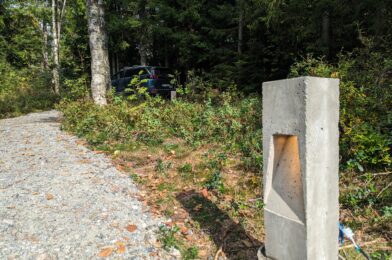
A small light post made out of concrete which houses a single spotlight that shines downward and scatters the light down on the ground. The description said it was easy to make a mold out of wood, and pour concrete in it. I think it would be great to have some small light posts at our cabin to light up the path from the parking area to the cabin. I imagined these kind of lights to fit really well in the area since they do not take up too much space, give a nice indirect glow of light low at the ground. I figured if I make them myself they hopefully would not get too expensive either.
Obviously, to make the mold I’d need some wood. I settled on cheap spruce wood for the vertical parts and some oak wood for the base purely because I had a piece laying around and it seemed a bit stronger. Additionally I bought:
I learned that concrete is not to be confused with cement. Cement is an ingredient of concrete, which I found out whilst shopping for this project. I also learned that there are different types of concrete, indicated by the B-number. B30 is appropriate for outdoor use, hence why I went for this.
The 200mm bolts stick out of the bottom of each light and will act as an anker once I mount the lights at the cabin. The screw rods I figured would act as some cheap form of reinforcement. The fishing wire is to keep the electric tube and screw rods in place while pouring the concrete.
Since I’d be making a reusable mold I’d decided to try and make 6 light posts. Why 6? I don’t know, it just felt right.
The building process of the mold was fairly straight forward. I’d labelled all the sides (A, B, C & D) and made sure to use 3 screws between all sides to firmly hold them together in a square. Side A would hold the diagonal piece and cut-out for the lightbulb, whilst side C would hold the electrical box.


The sides mount on top of a base plate using a total of 8 screws. I also used some foam in between the base plate and the sides to try and make them watertight and thus prevent concrete from leaking out while it was drying.

Cross section of mold before pouring the concrete
The screw rods are hanging in the mold with the use of fishing wire, and run most of the length from top to bottom. The electrical box and tube are held in place using hot glue. After everything was screwed and glued together I mixed the concrete in small batches (~2kg per batch) and slowly filled the mold with concrete. Then I’d have to wait at least a day for the concrete to dry.
The first light post came out decent, but had some flaws.
Firstly, in this first build I’d opted to mount the GU10 holder before pouring concrete instead of leaving a cut-out. This resulted in the holder filling up with concrete and the concrete becoming slightly electrified when 230V is applied, which makes your fingers tingle when you touch it.
Secondly, I found that it was hard to remove the cut-out for the lightbulb without damaging the concrete. I figured this was due to three reasons; firstly I’d been impatient and removed the light post from the mold after 1 day. Concrete officially takes 28 days to fully dry out, and removing it after 1 day meant the concrete was still quite brittle. Secondly since I did not use any lubricant on the wood it got stuck to the concrete. Thirdly the concrete’s thickness between the cutout and the side of the light post was relatively thin, so a small amount of force would cause this part to break.


Left picture: the light post after it came out of the mold. Top right picture: the cut-out. Bottom right picture: the first test. Note here that the concrete has broken off in front of the lightbulb due to removing the cut-out.
Having learned from the first light post I’d now made the following improvements:

The second light post, tested in twilight.
The second light post I poured came out better, however it was still difficult to keep the concrete between the cut-out and the side intact as it was just so thin. This is a problem that all subsequent light posts also had, and my solution was to try and glue together the bits that fell off as best as I could and treat the lights after they’d been installed with a concrete-repair solution – in other words a problem for future me.
When I knew this method worked well enough, I sat down and made all the parts for the other 4 lights I wanted to make.

Mass producing the parts for the other 4 lights.
Pouring all 6 lights took me around 3 months. Before shipping them off to the cabin I tested them all and made sure to cap off the electrical box so that no water/animals would crawl into them while they were being mounted at the cabin.

The final 2 light posts, standing upside down and ready for transport.
My hope was that I could simply place the light posts at the cabin in the ground and that the bolt on the bottom of each light post would keep them in place. However when testing this it became apparent that this just would not work, and that they would fall over very easily. So I reverted to more concrete pouring. For this I dug out a hole until I hit the rock bottom. Then I placed large cardboard tubes in the hole, which I filled up with concrete. I also pushed some 20cm long PVC pipe (sealed on each end) in the middle of the drying concrete and held that in place with a brick.


What is the purpose of the PVC pipe you might ask? Well, after a day of drying I would remove the PVC pipe, fill up the hole with fresh concrete and place the light post with its pin inside this fresh concrete, whilst the weight of the light post would be supported by the concrete poured the day before. This allowed me to place the light posts flush with the concrete, and allowed for some adjustment to make them stand exactly straight before the concrete would dry. Genius, right?

This picture shows 4 lights. Can you find them all?
I ended up placing 5 lights. 2 next to the parking space and 3 next to the path. The sixth light has as mentioned some electrical issues, but we might be able to place it elsewhere and powering it using 12VDC.
After putting them up (& waiting 5 months for the winter to pass) I swapped the backplate for a waterproof junction box, and wired them all up using outdoor-rated cabling.

The junction box. Here shown during installation.
I also installed a 16A Zigbee Mini Smart Switch to control the lights through Home Assistant. This particular version also has the option to add a manual switch, which we might add in the future. Lastly I buried the cable connecting the light posts to a depth of 1-10cm, and after that it was time to wait for twilight and enjoy a job well done.

The first test. They all light up!

In the dark. This is when they look their best.
I really enjoyed this project, even though it took me almost a year to finish it. Not only did I learn a thing or two about concrete, but we now also have some beautiful lights at our cabin, which’ll hopefully stand there for many many years.
A special thanks to Helge in assisting me preparing the water pump, checking the drain and a thanks to both Arve and Helge with hogging the trees!
I recently got the keys of our cabin. Since this time I’ve been preparing it so my parents can come and be there for a few weeks during the winter. There are 1001 things I want to do there, but for the first few jobs we prioritized the ones that were most essential. The most essential was the water. During the winter the waterpipe freezes as it lies on the surface, so the cabin only has a pipe with running water from roughly April to October. If somebody wants to be there during the winter they need to bring and store their own water. The cabin has one (very old) sink and drain pipe, but the previous owner said they never used it. This meant we were unsure on the status of the drain, and if water actually leaves the cabin.
In order to make life at the cabin a bit more comfortable we installed a small pump and a waterpipe inside the cabin which allows you to wash your hands. In addition to that we checked the status of the drain, and made it so that water can safely be drained during the coming winter. We plan for this solution to be here only for a few months until spring allows for building something more integrated, but it is now possible to operate it as-is for at least a few years (just in case). Lastly, we decided to cut down some trees to get more light and a better view.
Beneath the cabin there used to be a well which in the old days was used for supplying water. A handpump was connected to this well, which allowed you to pump up the water and for example wash your hands or fill up a bowl over a small sink. This system is still mounted on the wall, but the pump is disconnected from the well.

In order to get running water in the cabin we bought a small boat-pump, a hose, a switch and a bucket. The bucket will hold (drinking-)water which is filled up with the use of jerrycans. The pump can be lowered into the bucket and will, once powered on, pump the water through the pipe which is mounted with zip-ties to the old water pipe. This system was installed in a few hours, where the biggest challenge was to find a good location for the on/off switch and running the wires/pipes in a neat way.

During installation we found that a small cutting board that was nailed to the wall. It was there to hide a hole in the wall, and turned out to be a perfect holder for our switch.

A few hours of work, and suddenly we had running water!

Checking the drain turned out to be a more difficult job then we initially expected. The drain is a single pipe running from the sink to a concrete box outside filled with sand and small stones. These filter the water, after which it is released into the nature.
We had hoped that the water would run through this entire pipe and into the box. However, when we tried to pour water through the sink no water appeared inside the box. That meant the pipe had a breach somewhere, and we would have to locate it in order to make sure no water was leaking inside the cabin.
Firstly, we attempted to go underneath the cabin to check if we could find the drain pipe. This we did not, but we did find the old (disconnected) well which in the old days was used for the water supply.

Outside the cabin we found that the drain pipe was overgrown with a tree. Judging by the size of the tree the pipe must have been there for many decades. It looked like this was at least one of the places the pipe was broken.

Ultimately we were able to find a spot outside where the pipe was easy to take apart and where water which was thrown into the sink was running out. At this point we dug a hole in the ground and filled it with gravel and stones. This will act as a filter, and allows us to use the sink during the upcoming winter without a risk of the pipe clogging up.

While we were working outside I installed some Christmas lights to make it a bit more cozy.

The cabin is located at some height, but the view is completely blocked by mainly a big fir tree and many smaller trees. Cutting down trees is a job which can be done in a day and does not need much preparation, so we therefore decided to go to the cabin one day and start cutting down on the trees which were blocking the view.

We started by cutting down the tree which had grown over the drain pipe and the large fir tree.
Cutting down the trees went surprisingly fast. Since we had the entire day we continued cutting down on some rotten trees and in general thinning out the amount of trees which were in the way. To assist we had a 4×4 which was very useful in pulling trees down in the right direction and in moving the cut down trees.

When the day was done there was a much better view and much more daylight! The increased amount of daylight is a welcome addition in the short winter days.

The cabin is now ready to be inhabited for a couple of weeks in a row. We have many jobs left which we hopefully can start on during the spring, but for now there is (some form of) running water, enough wood to heat the cabin and a decent view with sufficient daylight to not get depressed.
Cheers, Jesper
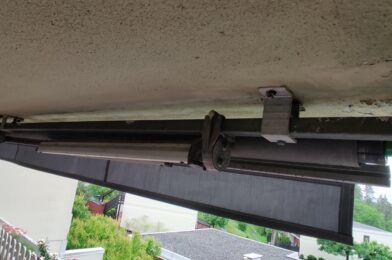
Installing the Dooya awning motor was a bit cumbersome, due to the sheer size of the awning. Our awning is 7 meters long, which means that it requires at least 3 persons to lift the unit off and on the roof. In total we needed 2 installation attempts. During the first attempt we managed to remove the old, manual crank system and slide the motor into the awning. After we slid in the motor we found that the manual crank system was wider than the new motor, which meant the motor could not be slid in completely whilst also being attached to the side plate supporting the awning:


Old crank vs. new motor. The lower picture shows that the motor is not fully slid into the awning.
To allow the motor to be slid in completely there were basically 2 options:
Shortening the support beam would be the most elegant solution, although this means that reverting to the manual crank at a later time will not be possible. The quality of the motor is not known, and failure is always an option. Therefore we chose to get some 50mm M6 bolts and a whole bunch of washers to offset the motor from the side plate. Simultaneously, the motor was rotated 180 degrees so that the power cable and antenna would exit on the top instead of the bottom, allowing for neater cable management.

After pairing the remote control to the motor and adjusting the outer limits, it was very satisfying to find out that it working well. It looks like the motor has enough torque to comfortably pull the awning back up, which hopefully means it won’t break in the near future.
The remote control uses Z-Wave to steer the up & down movement of the motor. Homey is able to steer Z-Wave devices, and according to the Homey forums the Brel Motors app should be able to be paired to and control the Dooya DM45RM motor that is installed here.


On the left: Pairing the Dooya motor
On the right: The control interface in Homey.
Pairing was very simple. The app asks to push one of the buttons on the remote control that is already paired to the motor. From that signal it can determine the unique communication key to the motor (which ensures that a neighbor won’t accidentally control my motor), as well as the correct up, down & stop signal. A concern I had was that Homey was too far away to reliably control the motor, as it is positioned 3 rooms away from the motor, but the Z-Wave signal seems to have no problem reaching the motor.
My Homey was already integrated into Google Home. After a quick refresh, the Sunshade appeared in the Google Home app. Sweet!

And finally, it was time for a test:
You may notice that I say ‘close the sunshade’ instead of ‘lower the sunshade’. This is because Google recognizes the awning as blinds, which means they can only be ‘closed’ and ‘opened’. Fortunately this is not a problem whatsoever as it is easy to remember, and in the worst case Google doesn’t understand our command and we need to say it twice.
With Homey being able to control the awning, I could program a couple of ‘flows’. Flows can be compared with IFTTT applets that are managed and run inside Homey.


To the left: 4 flows to automatically steer the awning.
To the right: detailed view of the flow that lowers the awning.
I set up 4 flows for now:
The flows that retract the awning will always run once they are triggered, regardless if the first flow has been triggered or not. This is because we are able to lower the awning manually with the remote control, and this motor only allows for a one-way communication. Therefore Homey has no way of knowing the current state of the awning. If the awning is already retracted, the motor is blocked by the end-switch and nothing will happen. To avoid spamming the motor with retract-signals a timer set to 1 hour is activated, which blocks new retract signals.
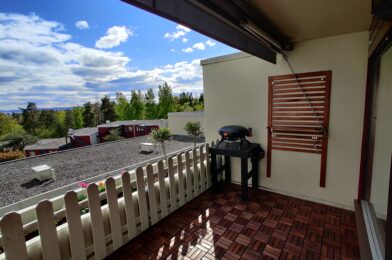
With this project done the balcony refurbishment is (for now) complete. We can now comfortably sit outside, enjoy the view and get ourselves some shadow whenever we want it with very little effort. The last couple of days have been quite sunny as well, so we have been able to enjoy our new setup quite a lot.
It’s Corona-time! Therefore (almost) everybody has a lot of time at home, including me. In order to make the most out of the situation my girlfriend and I decided it was a good idea to invest some time and money into our balcony as we can see this directly from the living room. During the day this is also the part of the house that gets the most sun as it is located at the south side of the apartment. Renovating this part of the house will therefore allow us to enjoy the outdoor weather during the spring/summer and simultaneously improve the view we have from inside the house.
The first step in renovating the balcony was to make a list of things that needed to be done.


The situation before the renovation
I started with removing the wooden fences. This was easy as they were hanging on the planter with the help of hooks, and they were only fastened by screws in the bottom. After removing the fence it was time for the grass and the floor. First the grass was gathered in waste bags, after which I cut up the floor in pieces of 90cm (so they would fit perpendicular in the trunk of my car).

Before and after the floor and grass removal
I then could drive all the old flooring to the local landfill. With everything removed it was the perfect time to paint the walls. Both the red and the white had to be done, so on a nice (semi) sunny day I set to work.

To determine the color of the fence I made a 3D model of the balcony in Google Sketchup. In our area there are 3 common colors: red, white and brown/black. The 3D model allowed us to quickly change the color to see what looked best:


In the end, we decided white would look the best. Brown/black made it look like a barcode, while red would not really fit onto the white planter and the trees in the background. We therefore choose to paint the fence white.
It was then time to lay the new floor. The RUNNEN floortiles are very easily clicked into place, and give a very nice result for such a short time. I again made a timelapse of the process, which can be found below:
At this point, we bought some plants and planted those in the planter. After replacing the fence and securing it into place the balcony was almost done.

The last thing that was missing was a nice place to sit and enjoy our newly refurbished balcony. After some consideration we again reverted to IKEA, this time to buy an ÄPPLARÖ 4-seat lounge set.

I’m really looking forward to drink a cup of coffee there during the morning, and to enjoy a beer during the evening. The entire family is happy with how it turned out, and hopefully we’ll get a lot of sunny days this year to enjoy the outdoors!
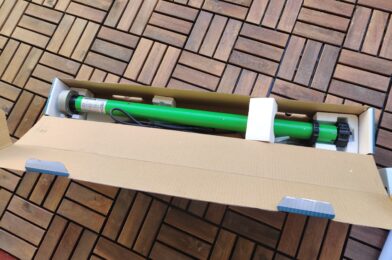
I bought this 200 watt motor to motorize our awning. This specific model is a Dooya DM45RM tubular motor, which is able to deliver 40 Nm of torque. Hopefully this will pull our 7 meters long sunshade in and out without problems.
As a bonus, it looks like this unit can be connected directly to Homey, which also means a Google Home integration (via Homey) is possible (‘Hey Google, give us some shadow’). I’m looking forward to install this bad boy!