NOAA Weather Satellite reception

Sometimes when I’m browsing the web I come across something I just feel I have to try. The other day I was recommended a video of somebody who built a system that can receive NOAA Weather Satellite images. The cool thing about these satellites (NOAA-15, NOAA-18 and NOAA-19) is that they fly overhead roughly twice a day and beam down weather information as they pass by. This includes a visual scan of the earth, participation measurements and a bunch of other values. The data is free to be picked up by anybody who owns an antenna and is able to tune in to the correct frequency (~137MHz).

People naturally have already developed tools to receive and process this information into readily available pictures. One such tool is this project, a software collection that runs on a Raspberry Pi. Since I have a few of them unused laying around I practically only lacked an antenna and a SDR (Software Defined Radio). So I went ahead and ordered a kit that includes both. The antenna is a bit primitive but will surely do to get started.

If tests are successful my plan is to build a proper antenna (a QHF antenna seems pretty good) and place it at our cabin. From there I can auto-upload the pictures to my server and have them displayed on my Magic Mirror once they come in.

Steampunk Taptower build

I can’t believe this project took me almost a year to complete! In August 2019 I was browsing around Thingiverse for some cool idea’s to 3D print, when I found a Steampunk Tap Handle made by Fuzzie/The Beergineer:

I knew I wanted this as well, so I 3D printed the parts, spray-painted them and assembled them together with some scrap tubing and 8mm screwing rods. I also had some leftover APA102 LED strip from the Ambilight system laying around which could be used to light up the tap handle, and I ordered a couple of Arduino Nano’s to control this LED strip.

The assembled beer tab, with multi-colored LED’s on the inside.

The prototype was up and running rather quickly. I put the Arduino on a breadboard, connected the light strip to it and uploaded the code from The Beergineer. Before it worked though I made some changes to the code, which can be found on Bitbucket (including the changelog). Most notably I introduced interrupt-based reading of the push button opposed to polling it. This push button is used to change the light pattern shown inside the tab handle. I also programmed it so that every time the button is pressed, the new state is written to EEPROM so the same light pattern is shown after a power outage. Lastly I changed the main loop from an if-else loop (which had 4 if-statements) to a switch, to prevent unnecessary calculations.

Arduino Nano on a breadboard. Note the beautiful ‘push button’, aka red wire with capacitor.

And it was at this moment where this project ended up in a moving box, and didn’t find it’s way out until June 2020…

Installation

Almost 10 months after I started this project I dug up the beer tap as we would be going to our cabin during the holiday, which is where I planned on installing this. Before installation the Arduino was put inside a plastic box and covered in hot glue, to give it some resistance against rain. I soldered the wires to the headers, installed a push button on the outside of the case and put a Molex connector on the wires to make installation easy. Additionally I added a switch connected to the Arduino, which can turn the LED’s inside the handle on and off.

IMG_20200630_154312
IMG_20200701_131908
On the top: planning the box-layout.
On the bottom: components are in place.


At our cabin we have a refrigerator with a beer tab on top. Installation was a matter of unscrewing the old tab and screwing on the new tab.

IMG_20200704_151937
IMG_20200704_153851
IMG_20200705_195329
Installation of the Steampunk Beer Tab.


During the night, the LED’s inside the Tab Handle create a very cool looking scene:

IMG_20200725_223256
IMG_20200725_223221
IMG_20200725_223210
The Beer Tab at night, showing different light patterns.


I think this was a fun little project to do. Unfortunately I wasn’t able to properly hide the cables as the metal in the tab tower was too strong to drill through with the tools we had available at the cabin. Therefore, they run on top to the black box which holds the Arduino. Other than that, I am very happy with the result.

Cheers! And don’t forget, keep Beergineering!

Jesper

Roborock S5 Max

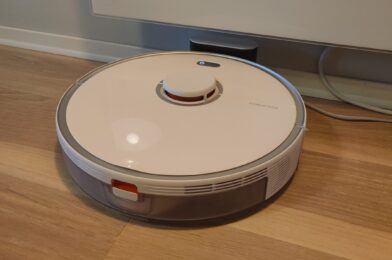
Please meet Dustin! For my girlfriends birthday I bought a Xiaomi Roborock S5 Max, after having talked about it for many months. I dislike vacuuming and do this at most once a week. My girlfriend on the other hand would like me to vacuum every day, so we both agreed this could be a very good solution for the both of us! The Roborock S5 Max is able to do both vacuum cleaning and mopping, and I haven’t been able to find any negative review of them, hence why I choose this model.

The Roborock S5 Max has the possibility to change the name. So after a short brainstorm session with the family ranging from Bob, JARVIS (which is already the name of the house) and Dusty we landed on Dustin.

First impressions

My first impressions with this product are very positive! Dustin has a LiDAR sensor peeking out from the roof, which it uses for navigation and mapping. The mapping feature is very impressive, as it creates a 2D map of my house while it is vacuuming. Simultaneously it logs on the map where it is and where it has been. In addition to the LiDAR it has a big bumper with a pressure sensor on the front to stop it running into low items, and sensors on the bottom preventing it from falling down the stairs.

Screenshot_20200628-102150
Screenshot_20200628-120551
  • Running Dustin for the first time. On the top, mapping the house for the first time. On the bottom, mapping and cleaning were done.

After the house was mapped you can manually divide it into different rooms. This allows you to clean specific rooms, or set different vacuum/mopping settings depending on which room it is in. The map also allows for setting ‘no go zones’ and ‘virtual walls’, which make it not go into a specified area.

The LiDAR is slightly offset from the middle. This means it can do a 360 on the spot to very accurately see depth, which means you can manually set it anywhere in your house and it is able to locate itself and automatically drive back to the dock. I have tried this a couple of times, and in ~80% of the instances it successfully managed to locate itself in the house and return to the dock.

Screenshot_20200628-173154
  • Mapping complete, and the house is divided into rooms. Also a no-go zone (the red square) and no-mopping zones (the purple squares) have been set up.

Using the map you can also drop a pin to where you want it to go to. After it reached this location, you can tell it to do a ‘Spot Cleaning’, which cleans an area of 1,5m² around that spot. Very handy!

Are there any shortcomings?

I have found a few so far. When the LiDAR sees a mirror, it is convinced the room is 2x bigger than it actually is due to the reflection. This causes it to misjudge where walls are, and it get’s confused as it tries to reach these spaces. In my case, when cleaning the hallway it finds that there must be a room connected to the hallway that extends into the wardrobe, and that it actually extends all the way into the living room. It then tries to drive around to the other side to access this room, only to see that there actually is a wall there. It tries this three times in a row before it gives up cleaning this area (but hey, it shows commitment!).

Screenshot_20200703-141416
Screenshot_20200703-141841
  • On the left, the map is shown as when Dustin is placed in front of the mirror. The closet is painted red in Photoshop, and it can be seen that the walls on the back of the closet have disappeared. On the right, you can see that Dustin tried to drive back and forth a couple of times, and that when it is on the back side of the closet the walls are drawn as they are.

Another shortcoming is that it sometimes gets stuck on the doorway steps, especially when it tries to drive parallel over the doorway steps. There might be a solution by creating a separate room over these doorsteps as suggested on Reddit, but I haven’t been able to test this properly yet.

Lastly, I haven’t been able to find a way to integrate this unit into my Athom Homey. To centralize all my automation’s I’d like to have it integrated into Homey, but unfortunately the Xiaomi Mi Home library is not updated which means it cannot talk to this Roborock model. For now I integrated it directly into Google Home (an integration that would normally have been done through Homey), which at least enables voice steering.

Conclusion

So far, Dustin has been vacuuming our house multiple times in the last week. The rest of the family seems to be happy with him as they are using him extensively and without my help. I have good faith in that I’m able to fix the doorway problem, and if all else fails I can always make them lower so that Dustin is able to clear them better. All in all, I am very happy we finally have one running around :).

If you have any tips/updates on the Homey integration or the other issues I’m seeing, feel free to drop me a comment below!

Awning Motor

I bought this 200 watt motor to motorize our awning. This specific model is a Dooya DM45RM tubular motor, which is able to deliver 40 Nm of torque. Hopefully this will pull our 7 meters long sunshade in and out without problems.

As a bonus, it looks like this unit can be connected directly to Homey, which also means a Google Home integration (via Homey) is possible (‘Hey Google, give us some shadow’). I’m looking forward to install this bad boy!