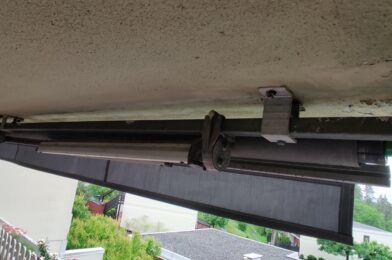
Installing the Dooya awning motor was a bit cumbersome, due to the sheer size of the awning. Our awning is 7 meters long, which means that it requires at least 3 persons to lift the unit off and on the roof. In total we needed 2 installation attempts. During the first attempt we managed to remove the old, manual crank system and slide the motor into the awning. After we slid in the motor we found that the manual crank system was wider than the new motor, which meant the motor could not be slid in completely whilst also being attached to the side plate supporting the awning:


Old crank vs. new motor. The lower picture shows that the motor is not fully slid into the awning.
To allow the motor to be slid in completely there were basically 2 options:
- Shorten the support beam holding the awning to the roof.
- Use bolts to offset the motor from the side plate.
Shortening the support beam would be the most elegant solution, although this means that reverting to the manual crank at a later time will not be possible. The quality of the motor is not known, and failure is always an option. Therefore we chose to get some 50mm M6 bolts and a whole bunch of washers to offset the motor from the side plate. Simultaneously, the motor was rotated 180 degrees so that the power cable and antenna would exit on the top instead of the bottom, allowing for neater cable management.

After pairing the remote control to the motor and adjusting the outer limits, it was very satisfying to find out that it working well. It looks like the motor has enough torque to comfortably pull the awning back up, which hopefully means it won’t break in the near future.
Homey and Google Home integration
The remote control uses Z-Wave to steer the up & down movement of the motor. Homey is able to steer Z-Wave devices, and according to the Homey forums the Brel Motors app should be able to be paired to and control the Dooya DM45RM motor that is installed here.


On the left: Pairing the Dooya motor
On the right: The control interface in Homey.
Pairing was very simple. The app asks to push one of the buttons on the remote control that is already paired to the motor. From that signal it can determine the unique communication key to the motor (which ensures that a neighbor won’t accidentally control my motor), as well as the correct up, down & stop signal. A concern I had was that Homey was too far away to reliably control the motor, as it is positioned 3 rooms away from the motor, but the Z-Wave signal seems to have no problem reaching the motor.
My Homey was already integrated into Google Home. After a quick refresh, the Sunshade appeared in the Google Home app. Sweet!

And finally, it was time for a test:
You may notice that I say ‘close the sunshade’ instead of ‘lower the sunshade’. This is because Google recognizes the awning as blinds, which means they can only be ‘closed’ and ‘opened’. Fortunately this is not a problem whatsoever as it is easy to remember, and in the worst case Google doesn’t understand our command and we need to say it twice.
Some more Homey configuration
With Homey being able to control the awning, I could program a couple of ‘flows’. Flows can be compared with IFTTT applets that are managed and run inside Homey.


To the left: 4 flows to automatically steer the awning.
To the right: detailed view of the flow that lowers the awning.
I set up 4 flows for now:
- The first flow automatically lowers the awning at 11:00 if the weather is good.
- The second flow retracts the awning at sunset.
- The third flow retracts the awning when the weather applet shows it’s raining.
- The fourth flow retracts the awning when the weather applet shows the wind speed is over 39 km/h, which equals to Beaufort 6 or higher.
The flows that retract the awning will always run once they are triggered, regardless if the first flow has been triggered or not. This is because we are able to lower the awning manually with the remote control, and this motor only allows for a one-way communication. Therefore Homey has no way of knowing the current state of the awning. If the awning is already retracted, the motor is blocked by the end-switch and nothing will happen. To avoid spamming the motor with retract-signals a timer set to 1 hour is activated, which blocks new retract signals.
With this project done the balcony refurbishment is (for now) complete. We can now comfortably sit outside, enjoy the view and get ourselves some shadow whenever we want it with very little effort. The last couple of days have been quite sunny as well, so we have been able to enjoy our new setup quite a lot.