I can’t believe this project took me almost a year to complete! In August 2019 I was browsing around Thingiverse for some cool idea’s to 3D print, when I found a Steampunk Tap Handle made by Fuzzie/The Beergineer:
I knew I wanted this as well, so I 3D printed the parts, spray-painted them and assembled them together with some scrap tubing and 8mm screwing rods. I also had some leftover APA102 LED strip from the Ambilight system laying around which could be used to light up the tap handle, and I ordered a couple of Arduino Nano’s to control this LED strip.

The prototype was up and running rather quickly. I put the Arduino on a breadboard, connected the light strip to it and uploaded the code from The Beergineer. Before it worked though I made some changes to the code, which can be found on Bitbucket (including the changelog). Most notably I introduced interrupt-based reading of the push button opposed to polling it. This push button is used to change the light pattern shown inside the tab handle. I also programmed it so that every time the button is pressed, the new state is written to EEPROM so the same light pattern is shown after a power outage. Lastly I changed the main loop from an if-else loop (which had 4 if-statements) to a switch, to prevent unnecessary calculations.

And it was at this moment where this project ended up in a moving box, and didn’t find it’s way out until June 2020…
Installation
Almost 10 months after I started this project I dug up the beer tap as we would be going to our cabin during the holiday, which is where I planned on installing this. Before installation the Arduino was put inside a plastic box and covered in hot glue, to give it some resistance against rain. I soldered the wires to the headers, installed a push button on the outside of the case and put a Molex connector on the wires to make installation easy. Additionally I added a switch connected to the Arduino, which can turn the LED’s inside the handle on and off.


On the top: planning the box-layout.
On the bottom: components are in place.
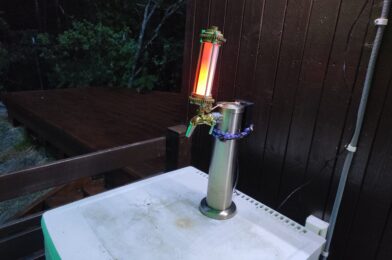
At our cabin we have a refrigerator with a beer tab on top. Installation was a matter of unscrewing the old tab and screwing on the new tab.


Installation of the Steampunk Beer Tab.
During the night, the LED’s inside the Tab Handle create a very cool looking scene:


The Beer Tab at night, showing different light patterns.
I think this was a fun little project to do. Unfortunately I wasn’t able to properly hide the cables as the metal in the tab tower was too strong to drill through with the tools we had available at the cabin. Therefore, they run on top to the black box which holds the Arduino. Other than that, I am very happy with the result.
Cheers! And don’t forget, keep Beergineering!
Jesper